How to Propagate Monstera Deliciosa: Finding the Node and Where to Cut
Cut a stem section with at least one node, preferably with an aerial root, and root it in water, perlite, or soil. See where the node is, why single leaves rot, and how long new leaves take.
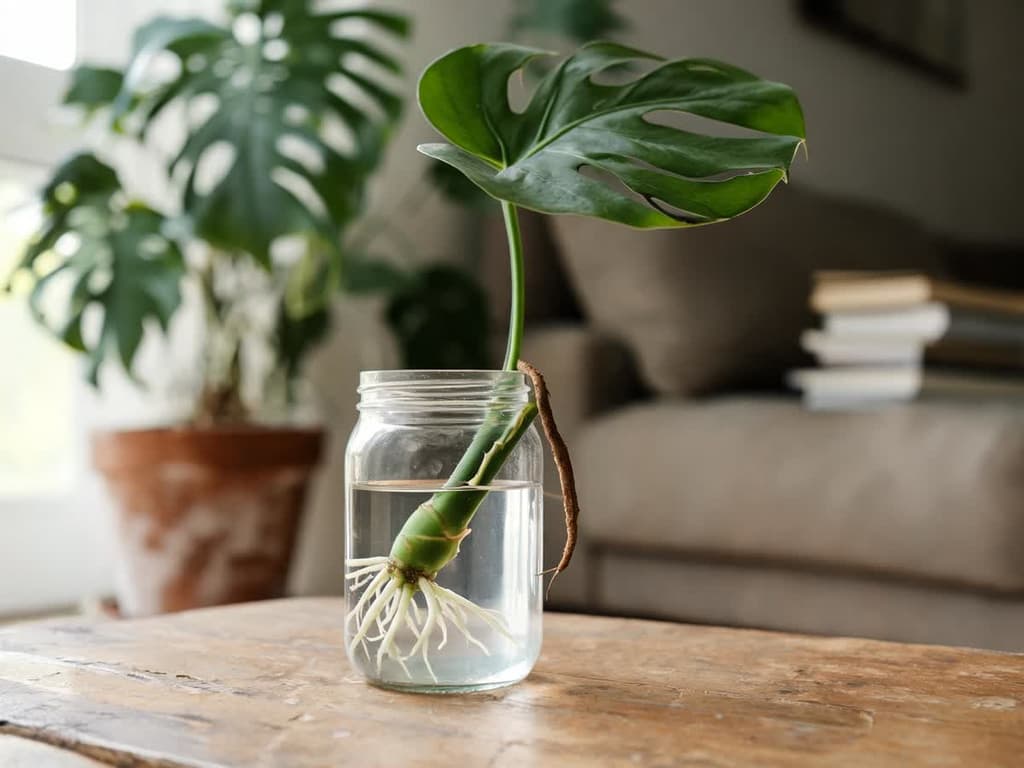
To propagate monstera (Monstera deliciosa), cut a piece of the stem that has at least one node, which is the ring where the leaf emerges. Ideally, choose a section with an aerial root (the brown root that grows out of the stem) and more than one leaf. Root this cutting in water, perlite (lightweight white stones), or potting soil. New roots appear in 2 to 4 weeks, and the first new leaf can take up to 2 to 3 months.
A leaf cut without a node will not become a plant. The University of Minnesota Extension service, which provides research-based public guidance, notes that it will not sprout and eventually rots. The mother plant stays alive after taking the cutting, retaining the rest of its stem, roots, and nodes.
Quick summary:
The node is the ring on the stem where the leaf grows out. The cutting's roots and new shoot emerge from it.
Cut 1 to 2 inches (2.5 to 5 cm) below the node, on the smooth section of stem between two nodes.
A leaf with a petiole (the stalk connecting the leaf to the stem) and no node does not form a new plant, according to the University of Minnesota.
Water, perlite, and potting soil all work. Roots formed in water are weaker than those developed in a solid medium.
The cutting roots in 2 to 4 weeks, and the first new leaf can take up to 2 to 3 months.
Where to find the monstera node
The node is the slightly raised ring on the monstera stem at the point where the leaf petiole clasps the stem. Right above the base of the petiole sits an axillary bud, which is a miniature shoot. The aerial root, the thick brown root that sprouts on the stem outside the soil, grows from the node.
A monstera stem alternates between nodes and smooth stretches. The smooth area between two nodes is called an internode. The University of Minnesota explains that a new plant develops from the bud and node on the stem. That is why every cutting must include at least one node.
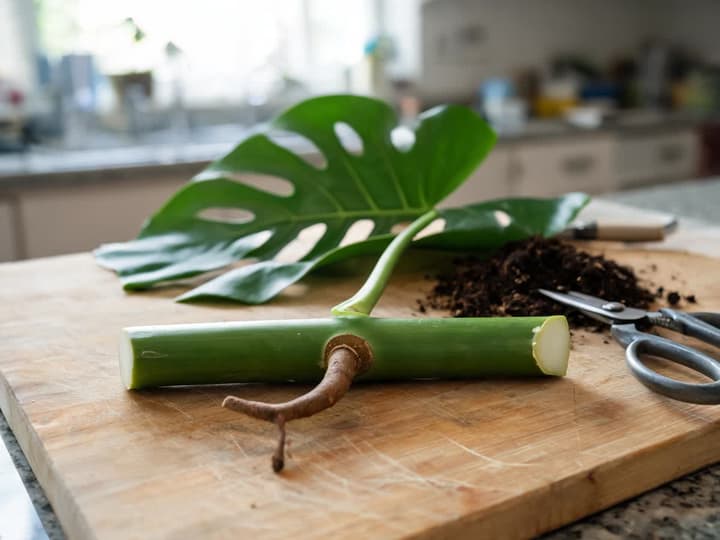
On a mature plant, find the node by tracing a leaf petiole back to the stem. The node is right where the petiole meets the stem. If an aerial root is emerging there, that is the best node to take for a cutting.
Can you propagate monstera from a leaf?
A monstera leaf alone does not grow into a plant. According to the University of Minnesota Extension, a cutting without a node and without a bud, like a leaf, does not form a new shoot and ends up rotting. The leaf and petiole do not grow into a plant on their own, because a new shoot only grows from the bud on the node.
A leaf kept in water sometimes puts out a few roots, yet it still fails to sprout. The North Carolina State University (NC State) propagation handbook explains why. A detached leaf carries no bud. It can only generate shoots in plant species that are able to form an adventitious bud on the cut tissue. Monstera does not belong to that group, according to Minnesota.
If you already have a leaf rooting in a glass, look at the base of the petiole. Without a piece of stem containing the node ring, it remains just a leaf and will not sprout. In that situation, take a stem cutting following the step-by-step guide below.
Single leaves also fail in other houseplants for the exact same lack of a bud. A schefflera leaf roots in soil but does not form a shoot. A hoya leaf sold in a small pot roots and almost never sprouts. A peace lily leaf in water never even manages to root.
Where to cut monstera to take a cutting
Cut the stem 2.5 to 5 cm below the chosen node, at the internode, as the University of Minnesota recommends. The University of Connecticut (UConn) recommends a longer stub, 8 to 13 cm. This guide follows Minnesota, because its page deals only with monstera propagation. If there is an aerial root at the node, cut just below it, as the University of Wisconsin Extension describes. The aerial root goes with the cutting.
Three choices improve the cutting:
Aerial root. UConn recommends taking as many aerial roots as possible.
Leaves. Minnesota states that having multiple leaves on the cutting aids rooting, because the foliage manufactures food for the cutting.
Stem tip or mid-stem. Wisconsin cuts the stem tip right below an aerial root. A mid-stem section also works, provided it has a node.
The mother plant survives the cut. According to Minnesota, new monstera growth sprouts from the buds on the stem nodes. Leave at least one node with a leaf on the parent plant's stem.
Step-by-step: how to propagate monstera from stem cuttings
Gather gloves, clean pruning shears, a jar with water or a pot with drainage holes filled with perlite or potting soil. Perlite consists of lightweight white granules of expanded volcanic rock, sold at garden centers.
Put on gloves. NC State states that monstera sap can irritate skin, and Penn State recommends gloves for handling the plant.
Wipe the blades of your shears with rubbing alcohol.
Choose a node that has an aerial root and at least one healthy leaf.
Cut the stem 1 to 2 inches (2.5 to 5 cm) below that node.
If you want, dust the node with powdered rooting hormone, a garden center product that stimulates root development. Minnesota notes that monstera roots without hormone, but the hormone speeds up rooting.
In water, keep the node submerged while the leaf stays out. In perlite or soil, make a hole, insert the cutting so the node and aerial root are covered, and leave the foliage above the surface.
Secure the cutting to a bamboo stake with a soft strip of cloth until roots develop. Use a heavy pot made of clay or ceramic: Minnesota warns that cuttings are top-heavy and tip over easily.
Place the cutting in bright, indirect light between 60 and 85 °F (16 and 29 °C), which is the temperature range NC State advises for monstera.
UConn notes that a stem with established aerial roots can be buried up to 2 to 3 inches (5 to 8 cm) below the first node, with a high success rate. That applies to longer stems. On a short cutting, cover the node as directed in step 6. Do not bury the growing tip, which is the curled shoot at the top of the stem: UConn warns that it rots more easily.
None of the extension offices consulted recommend applying cinnamon or pruning sealer to the cut, and none have tested whether this benefits monstera.
Propagating monstera in water, perlite, or soil
Monstera roots in water, perlite, potting soil, and expanded clay pebbles, the lightweight clay balls used in hydroponics. Minnesota refers to these four materials as rooting media: they support the cutting and maintain moisture. You do not need to root the cutting in water before moving it to soil.
Medium | Pros | Cautions |
|---|---|---|
Water | You can watch roots develop, and the cutting takes up minimal room | Change the water when it gets cloudy without letting roots dry out; water roots are more fragile |
Perlite | The most common medium used for monstera cuttings (Minnesota) | Keep evenly moist in a pot with drainage |
Potting soil | The cutting starts directly in its permanent growing medium | Cold, soggy soil leads to damping off, a disease that rots the cutting's base |
Expanded clay | Drains freely and tolerates more moisture without damping-off issues | Costs more, though it can be cleaned and reused |
Pick water if you want to watch root progress and do not mind if the cutting wilts or drops a leaf right after potting up. Pick perlite or potting soil if you prefer to pot it just once. Minnesota notes that roots formed in water are weaker than those developed in a solid medium.
When moving from water to a pot, wait until the new roots exceed 1 inch (2.5 cm). That is the length Iowa State University Extension suggests for potting up houseplant cuttings. Use a pot with drainage holes and moist potting soil. The guide on monstera soil mix provides the full blend for adult plants.
Air layering: rooting a new plant on the stem
Air layering grows roots directly on the stem while it remains attached to the mother plant, and you cut it free only afterward. It is the method for a tall monstera that has lost its bottom leaves. Penn State notes that monstera propagates most easily through air layering or stem cuttings.
The NC State manual outlines air layering for dracaena. Monstera belongs to the same broad group of plants, and none of our consulted sources detail step-by-step air layering instructions specific to monstera. These steps adapt that manual's instructions to fit the monstera node:
Pick a node that has an aerial root, about 12 inches (30 cm) below the stem tip.
Directly below that node, make an upward slant cut one-third of the way through the stem.
Keep the cut propped open using a toothpick.
If you choose, apply rooting hormone powder to the cut. NC State notes that hormone is not always necessary.
Wrap the cut and node with damp sphagnum moss, a dried moss sold in garden centers that holds substantial water.
Cover the moss with plastic wrap and secure both the top and bottom with tape.
Once the moss ball fills with roots, cut the stem right below it and pot up the new plant.
NC State explains why air layering works reliably: the stem continues drawing water and nutrients from the mother plant while roots form. None of the consulted sources specify a timeline for monstera.
Leafless stem sections can also become new plants
A long, leafless stem can be turned into multiple plants. The University of Wisconsin directs cutting the stem into 12-inch (30 cm) pieces. Press each section halfway into a tray filled with moist perlite or potting soil. UConn also mentions this leafless stem propagation method. A leggy dracaena that lost its lower foliage handles the same cut into bare stem segments.
Every piece must have at least one node, since that is where new shoots emerge. Keep the tray in bright, indirect light. After 2 to 4 weeks, gently lift a segment to inspect the roots. If they are white and firm, plant each section into its own pot, as instructed by Wisconsin.
Monstera division and basal shoots
Division only works when the pot contains multiple stems emerging from the soil, each with its own root system. Minnesota supports division as long as each divided clump includes a node. The University of Florida (UF/IFAS) points to basal shoots growing at the plant's base as another viable propagation method.
Take the plant out of its container, loosen soil from around the root ball, and separate the stems using your hands or a clean knife. Pot each stem into its own container at the exact same depth it was previously growing. A monstera with a single stem cannot be divided; for that plant, use stem cuttings or air layering.
Saving the top of a monstera with stem rot
The top portion of a monstera suffering from base rot can be salvaged as a cutting, provided it still has a firm node on healthy stem tissue. Minnesota notes that brown, mushy roots point to overwatering or a pot lacking drainage.
Cut the stem well above the black, mushy decay into green, firm tissue, making sure the cutting includes a node. None of our consulted sources measured the specific success rate of cuttings taken from rotting plants. Root this top section in clean water or perlite following the step-by-step instructions.
How long monstera cuttings take to root
A monstera cutting develops roots in roughly 2 to 4 weeks, according to the University of Minnesota. The first new leaf can take up to 2 to 3 months. Once roots establish, the same extension notes that producing a new leaf every few weeks is typical.
To check root progress in perlite or potting soil, carefully lift the cutting using a plant label or popsicle stick. Healthy roots look white and feel firm. Brown, mushy roots indicate waterlogged conditions or an undrained container, and a cutting with rotted roots may not survive.
Best time to propagate monstera in Brazil
Monstera can be propagated at any time of year, according to the Minnesota and Wisconsin extensions. Minnesota recommends 2 to 3 hours of extra light per day for cuttings taken in late fall and early winter. In Brazil, that period runs from May to July.
From September to December, in spring, the days in Brazil grow longer and warmer. If the cutting's location is dark at any time of year, use the 2 to 3 hours of extra light that Minnesota recommends.
Minnesota advises placing the cutting near a window with bright light, away from direct sun. Because it is in the Northern Hemisphere, it recommends north- and east-facing windows. In Brazil, the equivalent is a south- or east-facing window. Avoid direct sun from north- and west-facing windows.
Caring for your monstera cutting during the first weeks
Keep the perlite or potting soil consistently moist throughout the first week. Starting in the second week, let the surface dry out between waterings. Minnesota mentions keeping conditions evenly moist for 1 to 2 weeks; this guide uses the shorter window to reduce the risk of waterlogging the roots. Water at the sink and let excess drain thoroughly through the bottom hole.
Use a pot measuring at least 4 inches (10 cm) across and 5 inches (13 cm) deep, equipped with at least one drainage hole. Minnesota warns against using an oversized pot because it makes judging soil moisture difficult. As the cutting matures, move it up to a slightly larger container.
For mature plant maintenance, our guide on how to care for monstera covers lighting, moss poles, and fertilizer. Water schedules are detailed in our guide on how often to water monstera.
Monstera seeds
Monstera can grow from seed, but seed-grown seedlings develop slowly and require warmth. Wisconsin and UConn both note this, with UConn describing seeds as an infrequently used method. Minnesota adds that monstera almost never flowers or sets fruit indoors.
There is no such thing as variegated monstera seeds for plants showing white or yellow marbling. Minnesota explains that variegation stems from a mutation that appears only after germination. To obtain another variegated monstera, propagate via stem cuttings or air layering from an existing variegated mother plant.
Monstera, mini monstera, or tree philodendron?
This guide applies specifically to Monstera deliciosa. Three similar-looking plants are frequently mistaken for it:
*Monstera adansonii*. NC State notes that it is often confused with monstera. The adansonii is a smaller plant displaying smaller leaves.
Mini monstera (*Rhaphidophora tetrasperma*). NC State says it is not a monstera, although it belongs to the same family.
Guaimbê (*Thaumatophyllum bipinnatifidum*). Minnesota notes that the leaf of guaimbê features deep lobes but lacks the interior fenestrations (holes) found in monstera.
If you are unsure which variety you have, the Bloom app can identify the plant from a leaf photo.
Monstera is toxic to dogs and cats, according to the ASPCA, the animal poison control center in the United States. Keep cuttings and cut leaves out of reach of pets.
Frequently asked questions
How long can a monstera cutting stay in water?
A monstera cutting can stay in water until its new roots exceed 1 inch (2.5 cm), at which point it should move into a pot. Roots appear within 2 to 4 weeks, according to the University of Minnesota. No sources have tested how long it can survive indefinitely in water, though Minnesota notes that water-grown roots are weaker.
How can you make a monstera cutting root faster?
To help a monstera cutting root faster, use a stem section that has an aerial root and several leaves, and apply rooting hormone to the node. The University of Minnesota states that rooting hormone speeds root formation and that foliage supports development. Keep the cutting in a warm, bright spot out of direct sun, maintaining consistent moisture in the medium.
Can you bury the cutting's aerial root?
You can bury the aerial root on a monstera cutting, and doing so helps it establish. UConn notes that a long stem with developed aerial roots can be buried up to 2 to 3 inches (5 to 8 cm) below the first node with high success rates. The same university advises including as many aerial roots on the cutting as possible. Just make sure not to bury the growing tip.
Is monstera sap harmful?
Monstera sap can cause skin irritation, according to NC State. The reaction stems from needle-shaped calcium oxalate crystals. Penn State recommends wearing protective gloves when handling the plant. If a pet chews on the plant, contact a veterinarian immediately.
Where to start today
Trace a healthy leaf petiole down to your monstera stem and locate the node, ideally one featuring an aerial root. Wearing gloves, cut the stem 1 to 2 inches (2.5 to 5 cm) below that node. Place the node in water or tuck it into perlite with the leaf exposed, positioned near a bright window out of direct sun.
Sources
University of Minnesota Extension: Propagating Monstera deliciosa (revised in 2026). Accessed September 29, 2026.
University of Wisconsin–Madison, Wisconsin Horticulture: Split-leaf philodendron, Monstera deliciosa. Accessed on September 29, 2026.
Penn State Extension: Monstera as a Houseplant. Accessed September 29, 2026.
University of Connecticut, Home & Garden Education Center: Monstera deliciosa. Accessed on September 29, 2026.
NC State Extension Gardener Plant Toolbox: Monstera deliciosa, Monstera adansonii, and Rhaphidophora tetrasperma. Accessed September 29, 2026.
NC State Extension, Extension Gardener Handbook: chapter 13, Propagation. Accessed September 29, 2026.
University of Florida IFAS Extension: Monstera Growing in the Florida Home Landscape (HS311). Accessed September 29, 2026.
Iowa State University Extension and Outreach: How to Propagate Houseplants by Stem Tip Cuttings. Accessed on September 29, 2026.
ASPCA Animal Poison Control: Swiss Cheese Plant. Accessed September 29, 2026.
Related articles
How to Care for a Goldfish Plant: Light, Watering, and Blooms
How to care for a goldfish plant: bright light without strong sun, water when the soil surface dries, and humid air. Learn how to tell a Nematanthus from a Columnea, why it drops leaves, and how to get it to bloom again.
Lavender Leaves Turning Yellow: Where the Yellowing Starts Shows the Cause
Lower leaves turning yellow with moist soil means overwatered roots, the most common cause. Old leaves drying one by one on woody stems is normal. Take the stem and root test, see if your plant can still be saved, and find out what to do today.
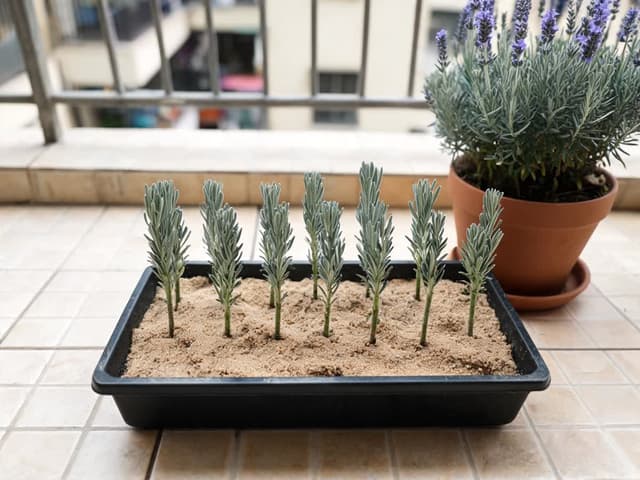
How to Propagate Lavender: Where to Cut and Why Cuttings Rot
A lavender cutting comes from a non-flowering branch tip, about 4 inches long, planted in sandy soil that never stays soggy. Learn where to cut, rooting times, seasonality in Brazil, and what to do if the base turns black.