How to Propagate Anthurium: Where to Cut and Why Aerial Roots Mark the Spot
Propagating anthurium works in two ways: dividing the clump or cutting the stem just below aerial roots, which many mistake for a defect. Learn the steps for both, the right timing, and why leaves and seeds fail.
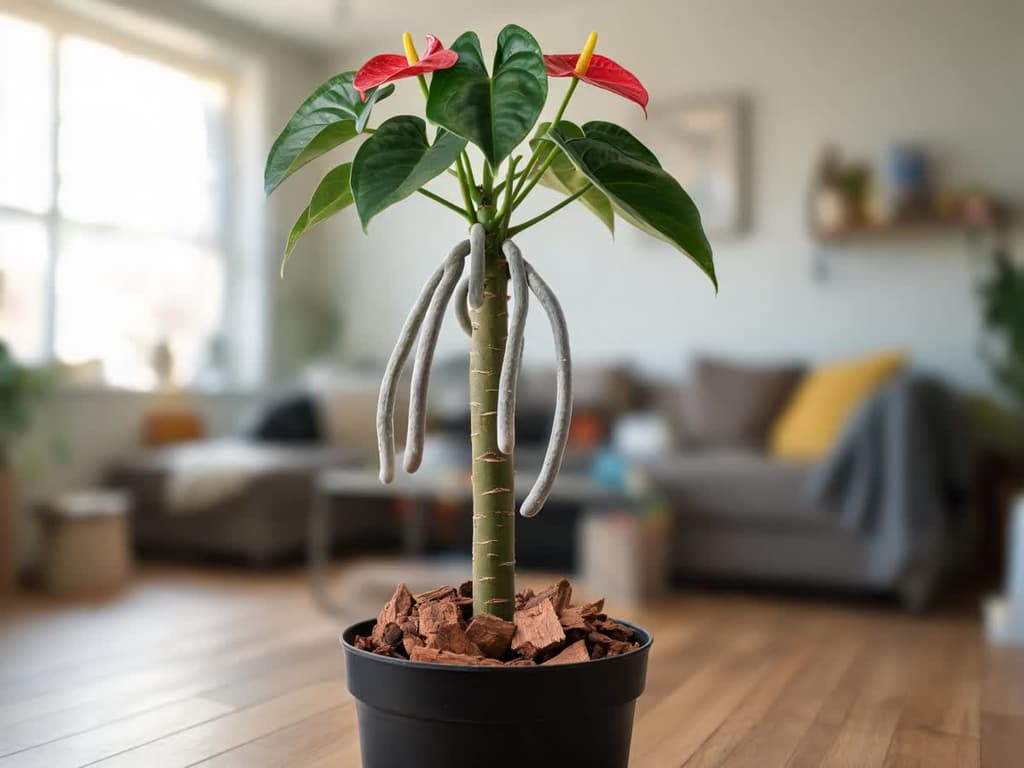
To propagate anthurium, two methods work at home. The first is dividing the clump, the cluster of stems growing together in the same pot, separating offsets with their own roots. The second is cutting the stem just below the aerial roots, those thick roots emerging from the stem above the soil.
If you thought those roots were a defect and considered cutting them off, put the shears away. They signal that the plant is ready to be propagated. A loose leaf, a flower, and a seed will not work for anyone wanting an anthurium (Anthurium andraeanum) cutting at home.
Quick summary:
Plant with offsets at the base: divide the clump. Each offset comes away with its own roots and 3 to 4 leaves.
Tall plant with a long stem and roots emerging above the soil: cut the stem just below the highest aerial roots. The top portion becomes a new plant, and the base left in the pot produces new shoots.
Timing in Brazil: spring, from September to November.
Wear gloves: anthurium sap irritates the skin and eyes.
Methods that work for anthurium, and those that fail
Anthuriums propagate by clump division and by stem cutting, which is a piece of the stem that grows new roots. These are the two methods recommended by NC State Extension in its species profile. Embrapa describes the same two in the 2012 technical book Antúrio, calling division "the simplest and most widely used method."
Method | What happens | Best suited plant |
|---|---|---|
Dividing the clump | Works and is the simplest method | Plant with offsets at the base, each offset having 3 to 4 leaves |
Cutting the top below the aerial roots | Works, and the cutting already has roots | Tall plant with a bare lower stem and roots emerging above the soil |
Bare stem segments | Works slowly: about 3 months until shoots appear | Long stem left behind after removing the top |
Leaf with petiole | Does not become a plant, because the leaf carries no bud | None: the bud is located on the stem |
Spadix, the yellow spike | Does not appear in any technical source as a propagation method | None: this is where the flowers are located |
Seed | About 3 years until the first bloom, and the plant differs from the mother plant | Only for breeding varieties |
Cutting in water | No technical source has measured this | Opt for moist sphagnum moss, described below |
Almost all commercial anthurium varieties are produced in laboratories today through tissue culture, according to publication EP159 from the University of Florida (UF/IFAS). At home, division and stem cuttings are the two methods that produce a plant identical to the one you have.
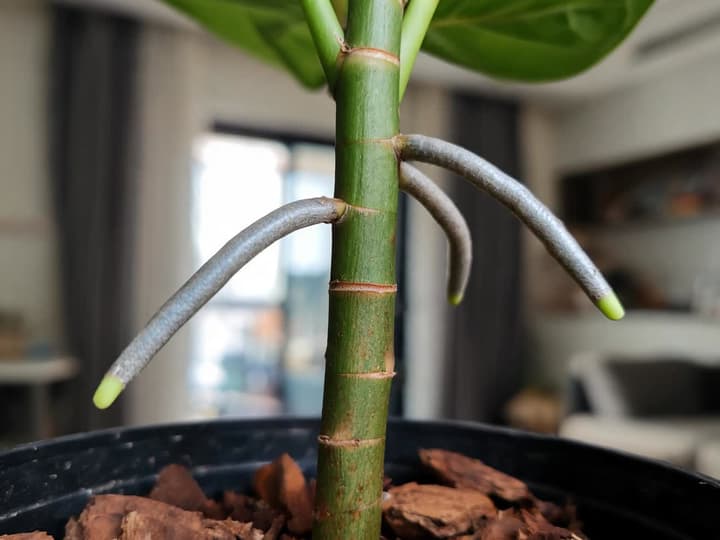
Aerial roots on the stem mark the cutting point for propagation
The thick roots emerging from the anthurium stem above the soil are normal and mark the right place to take a cutting. In nature, anthurium grows attached to trees. Its roots live in the air, on bark, and in moss, as explained in the anthurium care guide.
Embrapa describes the anthurium stem as erect and bearing adventitious roots, which are roots that arise from the stem rather than from another root. According to the same publication, these aerial roots absorb water from the air. This is why the cutting needs a very well-aerated potting mix.
Hawaiian anthurium growers use these roots as a guide. The manual Anthurium Culture in Hawaii, from the University of Hawaii, describes the method: the plant grows until it produces roots near the top of the stem. The top is then cut off along with these roots and becomes a new plant.
The base remaining in the pot, with its existing root system, produces two or more side shoots. The same cut therefore yields a top cutting and prompts the bottom plant to sprout anew. If you thought about trimming the aerial roots to make the plant look tidier, leave them where they are: they are what allow the cutting to establish.
What is the best time to propagate anthurium
The best time to propagate anthurium in Brazil is spring, from September to November. In the northern hemisphere, that same spring runs from March to May. Embrapa recommends spring in colder regions. The reason is that rising temperatures and air humidity favor root and leaf growth.
Where it does not get truly cold, any month during the growing season works, which runs from September to March in Brazil. From April to August in Brazil, the plant grows slowly and the cutting takes longer to establish.
The rule applies to both methods. If the plant needs a larger pot in the spring, take advantage of repotting. It will already be out of the pot, and dividing makes use of the same effort.
What to set aside before starting, including gloves
Anthurium sap contains calcium oxalate crystals. Contact with the skin or eyes causes redness and a burning sensation, according to the NC State Extension. The fact sheet classifies the plant as causing contact dermatitis, which is skin irritation from direct contact. Wear gloves to cut and divide, do not rub your eyes while working, and wash your hands when you finish.
The same crystals are found throughout all parts of the plant. They make anthurium toxic to cats and dogs that chew on a leaf or a stem piece. Pick up all cutting trimmings from the floor before letting pets back into the room.
Also gather:
Clean knife or shears, disinfected with alcohol. The Hawaii manual directs disinfecting every tool, because the cutting carries over any disease from the parent plant.
A pot with drainage holes for each cutting, sized to fit its roots without excess empty space around them. An oversized pot holds water that the roots cannot use.
Aerated substrate, the same mix used for mature anthurium (details below).
Sphagnum, dry moss sold in garden centers for orchids. It retains moisture around the base of a cutting with few roots.
How to propagate anthurium by clump division
Dividing the clump means separating the offsets growing around the main plant, each with its own leaves and roots. This works for anthuriums that have formed a dense cluster of multiple stems emerging from the soil, whether in a pot or a garden bed.
1. Remove the plant from its pot
Tip the pot on its side, hold the plant by the base of the stem, and slide the pot away without pulling on the leaves. In a garden bed, dig around the plant with a trowel and lift the entire root ball, which is the mass of soil bound to the roots. Pulling by the leaf tears it from the stem, leaving the plant stuck.
2. Loosen the potting mix until you see where each shoot originates
Work the soil away from the roots with your fingers until the base of each stem is visible. According to Embrapa, anthurium shoots emerge in two places: along the stem and underground. Those that form underground are the hardest to separate and require care to avoid tearing off too many roots.
3. Select shoots with 3 to 4 leaves
Embrapa recommends separating a shoot once it has three to four leaves. A smaller shoot has minimal roots and fewer stored reserves. Leave it on the parent plant for a few more months.
4. Separate by hand, using a knife only where it resists
Grasp the offset by the base and pull it away from the parent plant using a twisting motion. Where the joint will not yield, make a single clean cut with your disinfected knife. Each offset must come away with its own bundle of roots.
5. Shoots with few roots go into sand or sphagnum
If the offset detached with few roots, do not plant it directly into its final pot. Embrapa points to two solutions: planting the offset in sand until the roots develop, or wrapping the cut base with moist sphagnum moss. Move it to the permanent potting mix once new roots appear.
6. Plant at the original depth and water
Plant each offset at the exact depth it was growing, without burying the base of the leaves. Water until water drains through the holes, and place the pot in a bright spot without direct sun hitting the foliage.
How to propagate tall, leggy anthurium from stem cuttings
Older anthuriums often grow tall, developing a long, bare stem at the bottom lined with aerial roots. This is precisely the plant Embrapa designates for stem cuttings: the publication recommends the method for "old and tall plants."
1. Cut the top just below the highest aerial roots
Locate the aerial roots closest to the leaves. Using your disinfected knife, cut the stem just below them so the top section carries those roots along. This top section is the primary cutting, and it already has roots attached.
2. Pot the top like an established plant
Bury the top cutting's aerial roots in the potting mix up to the level where they emerge from the stem. Firm the soil with your fingers and water until liquid drains through the bottom hole. If the top cannot stand upright, stake the stem with a bamboo skewer.
3. Do not discard the base left in the pot
The rooted base remains in the pot and produces two or more side shoots, according to Embrapa and the Hawaii manual. Continue watering this base just as you watered the intact plant. The new shoots can later become cuttings by division once they grow 3 to 4 leaves.
4. If the bare stem is long, cut it into sections
If a long segment of bare stem remains, you can leave just a rooted stump at the bottom and make use of the rest. Embrapa cuts the stem into sections measuring 10 to 15 cm. If the stem is very thick, each piece can be as short as 3 to 4 cm.
Each section must have at least two buds. The bud is the point on the stem where new growth initiates, located at the node, that ring where a leaf was formerly attached. Embrapa treats the sections with a fungicide solution before planting.
5. Lay the section flat, or plant it upright
There are two ways to plant the stem section, according to Embrapa:
Lying flat: the entire piece is covered by a 2 cm layer of sand or substrate.
Upright: the top end extends 2 to 3 cm above the surface.
In both cases, keep moisture consistent without waterlogging or allowing it to dry out. Roots and shoots begin to emerge after about three months. When the new plantlet has five leaves, it can be separated from the stem piece and potted into its final container. Rooting hormone can speed up the process, but it is optional.
Potting mix and pot selection for anthurium cuttings
Anthurium cuttings root best in a loose, well-aerated mix: 1 part peat, 1 part perlite, and 1 part bark. This is the blend UF/IFAS recommends for rooting cuttings in commercial production. Peat is decomposed moss, and perlite consists of white expanded rock granules that create airspace. Pre-mixed orchid bark mix also works well.
Plain garden soil compacts and suffocates the root system. The explanation for this and the complete recipe are covered in the anthurium care guide. For cuttings, the pot guideline is simple: drainage holes at the bottom and a size only slightly larger than the roots.
Anthurium stem rotting: can the top be saved?
Yes, provided the tip still has aerial roots and the cut reveals firm tissue. The surviving green tip is essentially the top cutting method carried out as an emergency rescue.
Cut the stem above the point where it feels soft or looks dark.
Inspect the cut: firm, light-colored tissue is healthy. If the cut is still soft or discolored, cut higher up.
Wipe the blade with alcohol between cuts to avoid transferring rot to healthy tissue.
Plant the tip in fresh potting mix and a clean pot, never in the substrate from the diseased plant.
Embrapa points out that any cutting taken from a plant carries along the parent plant's pests and diseases. Keep the rescued cutting isolated from other houseplants during the first few weeks. Before trying again, determine what caused the plant to rot. Most of the time it stems from suffocated roots and overwatering, and the anthurium guide shows how to check if roots have rotted.
Does water propagation work for anthurium?
None of the technical sources cited in this guide root anthurium in water, and no one has measured the success rate of cuttings rooted this way. Embrapa uses sand and sphagnum, the Hawaii manual uses potting mix, and UF/IFAS uses the aerated blend of peat, perlite, and bark.
In the absence of measured data, the safest choice for the plant is wrapping moist sphagnum around the cut base. This is the method Embrapa describes to encourage vigorous rooting, and the cutting moves straight into potting mix once roots show.
Can you propagate anthurium from a leaf or seed?
From a leaf, no: an anthurium leaf, even with the complete petiole, carries no bud. The bud is on the stem, which is why Embrapa requires at least two buds on every stem cutting. An anthurium leaf placed in water might remain green, but it has no structure from which to sprout.
The wax plant shares the same limitation: the leaf alone roots but never sprouts. The notable exception among common houseplants is the watermelon peperomia, where a single leaf forms plantlets at the base of the petiole. Anthurium lacks this capability.
From seed, it is possible, but it will not work for anyone wanting an exact duplicate of their plant. The Hawaii manual details manual pollination using fingers or a soft brush. The yellow berries take 6 to 7 months to mature.
According to Embrapa and the University of Hawaii, the plant grown from seed differs from the parent plant. The first flower takes roughly three years to appear. Embrapa adds that the seed has low germination rates and is recalcitrant, meaning it dies if it dries out and cannot be stored.
The first months of an anthurium cutting
An offset divided with existing roots continues to grow without pause. A stem segment takes around three months to produce roots and shoots. The sign that the cutting has established is a new leaf and a firm hold in the pot, without wobbling when you touch the base.
Watering: water when the top 2 to 3 cm of substrate feels dry to the touch, until liquid exits through the drainage hole. A drip tray with standing water rots the base of the cutting.
Light: a bright location without direct sunlight hitting the foliage, just like a mature anthurium.
Fertilizer: none during the first month, since fresh substrate already supplies nutrients.
Patience with growth pace: Embrapa records 6 to 8 new leaves per stem each year. That works out to one new leaf every one to two months. A cutting without a new leaf for several weeks is well within this normal pace.
If the base of the cutting turns soft and dark, the issue is excess water in dense substrate. Cut above the softened area and repot in fresh mix, following the same stem rescue procedure.
Frequently Asked Questions
How long does an anthurium cutting take to establish?
It depends on the method. An offset divided with its own root system and a top section cut below aerial roots already have roots and continue growing. A bare stem segment takes around three months to develop roots and a shoot, according to Embrapa. The sign that the cutting has taken root is the emergence of a new leaf.
Can you propagate garden-grown anthuriums?
Yes, using the exact same process as potted plants. Dig around the clump with a trowel, lift the root ball, and separate offsets with 3 to 4 leaves and existing roots. Outdoor anthuriums that have grown leggy can also have their tops cut below the aerial roots. The cutting goes into a pot with an aerated potting mix.
Can I apply cinnamon powder to an anthurium cut?
No study has measured the effect of cinnamon on an anthurium cut. What Embrapa describes is treating stem cuttings with a fungicide solution before planting. Wiping the blade with alcohol is the measure supported by the University of Hawaii manual, and it costs very little.
Can an anthurium develop a long bare stem with leaves only at the top?
Yes, and that is normal for an older plant. Over time, lower leaves drop, leaving a bare stem covered in aerial roots. It is not a disease. This is the exact plant Embrapa recommends for stem cuttings: cut the top off below the aerial roots and allow the base to resprout.
Before reaching for the knife
Look first at the plant you have. Offsets at the base call for dividing the clump; a long stem with aerial roots calls for cutting the top. In both cases, gloves, a clean knife, and spring, from September to November in Brazil.
If the plant was inherited and you are not sure it is an anthurium, confirm before cutting. Bloom (available for iOS) identifies the species from a photo, and the free plan includes two identifications per month.
The above-ground stem gives anthurium two distinct propagation paths. The peace lily, another aroid, lacks this stem and multiplies only by clump division.
Sources
When sources disagree, this guide follows the Brazilian technical publication and the university extension, in that order.
Embrapa, Antúrio (Ana Cecília Ribeiro de Castro and others, technical editors), 2012, chapter 3, "Propagação", by Ana Cristina Portugal Pinto de Carvalho (alice.cnptia.embrapa.br).
University of Hawai'i, College of Tropical Agriculture and Human Resources, Anthurium Culture in Hawaii, Research Extension Series 152, 1995 (ctahr.hawaii.edu).
University of Florida IFAS Extension, Cultural Guidelines for Commercial Production of Interiorscape Anthurium, publication EP159 (ENH956), by Jianjun Chen et al. (ask.ifas.ufl.edu).
NC State Extension, North Carolina Extension Gardener Plant Toolbox, Anthurium andraeanum (plants.ces.ncsu.edu).
Related articles
How to Care for a Maidenhair Fern: Light, Water, and Revival Tips
Learn how to care for a maidenhair fern indoors: bright indirect light, consistently moist soil, high humidity, and how to revive it if it dries out completely.
How to Propagate Spider Plants: Root the Pup Before Cutting
The safest spider plant cutting comes from a pup still attached to the mother plant: rest the plantlet on soil in a small pot, wait for roots to establish, and only then cut the stolon. Learn when the pup is ready, whether rooting in water is worth it, how to divide the clump, and why plants fail to produce babies.
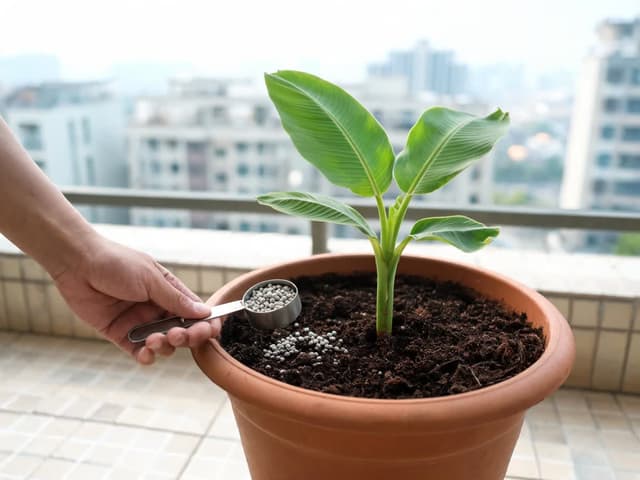
Banana plant fertilizer: fertilizing potted and backyard plants
Banana plant fertilizer needs more potassium than nitrogen, in a 3-1-6 ratio. For a potted plant on a balcony, use the label dose in spring and summer. In the backyard, fertilize every 2 months, adjusting the amount by mat age. Learn the formula, timing in Brazil, and signs of deficiency or excess.