How to Propagate Spider Plants: Root the Pup Before Cutting
The safest spider plant cutting comes from a pup still attached to the mother plant: rest the plantlet on soil in a small pot, wait for roots to establish, and only then cut the stolon. Learn when the pup is ready, whether rooting in water is worth it, how to divide the clump, and why plants fail to produce babies.
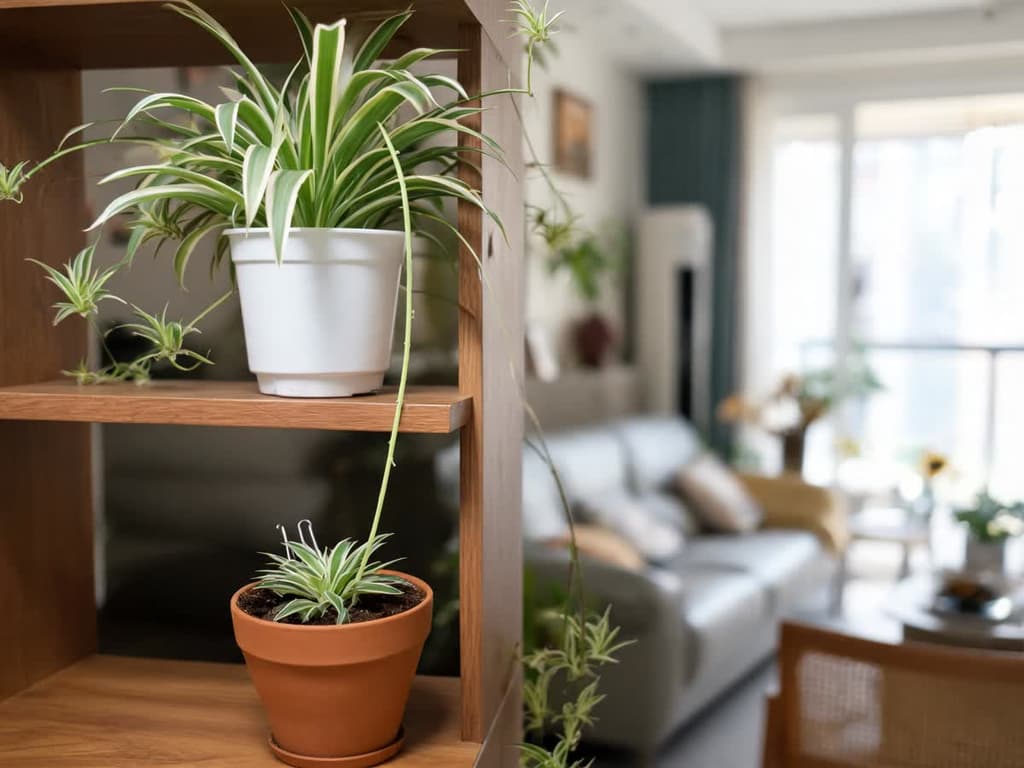
How to propagate a spider plant, in short: do not cut the pup off first. Rest the dangling plantlet, still attached to the mother plant, on top of moist soil in a small pot and secure it with a bent paper clip. Once it resists a gentle tug, the roots have taken hold: that is when you cut the runner connecting them. A plantlet that already has roots can be cut and planted directly. A large clump, an adult plant with many leaves growing from the same base, can also be divided when repotting.
Using the attached-plantlet method, the mother plant loses nothing, and the pup continues to draw energy from it until it develops its own roots. The spider plant (Chlorophytum comosum), also known as airplane plant or ribbon plant, is among the easiest houseplants to propagate at home.
Quick summary:
The pup takes root when it touches the soil. Clemson Extension describes spider plant propagation as easy for this reason.
The sign to cut is roots, not size: the plantlet resists a gentle tug or displays white roots at its base.
Both water and soil work, though no study has compared the two for spider plants. In soil, while still attached to the mother, the plantlet does not need to transition between environments later.
Plants younger than 1 year old, an oversized pot, and excess fertilizer are causes of spider plants failing to produce pups, along with low light and cold temperatures.
Ways to Propagate Spider Plants
There are five ways to propagate a spider plant, and four of them use the pup or the clump itself. The pup, also called an offshoot, is the plantlet that grows at the tip of the long stems hanging from the plant. This slender stem is called a runner. The pup does not come from seed: it sprouts at the tip of the stem after the flowers fade, according to the Wisconsin Extension.
Method | When to use | How long it takes | Risk |
|---|---|---|---|
Pup attached to the mother, resting on soil | Whenever a pup is within reach of a small pot | Until roots take hold; the New York Botanical Garden (NYBG) notes around 2 months | Lowest: the pup stays nourished by the mother |
Cut pup, already showing roots | Pup with visible white roots at the base | Plant immediately | Low, provided the soil is not waterlogged |
Cut pup, rooted in water | When you cannot position a pot beneath the pup | Until roots reach 1 inch (2.5 cm) | Moderate: the cutting must still adapt to soil afterward |
Clump division | When repotting a mature, crowded plant | Pot immediately | Low, provided each section has roots and leaves |
Seed | Only if the plant produces seed pods | None of the consulted sources specify a timeframe | Seedlings may lack the mother plant's white variegation |
How to Root a Pup Still Attached to the Mother Plant
The safest way to propagate a spider plant is to let the plantlet develop roots before detaching it from the mother. The Wisconsin Extension recommends doing just that: resting the attached pup on the soil of another pot and cutting the stolon only after the plantlet takes root. This mirrors nature, where runners reach the ground and take root on the spot.
Set aside a small pot with drainage holes at the bottom and standard, well-draining potting soil. To hold the pup in place, use a paper clip or a piece of bent wire.
Pick a pup with firm, green leaves, preferably one already showing small root nubs at the base.
Fill the small pot with standard potting soil and water it until water drains out of the bottom hole.
Set the small pot next to the mother plant, positioned at a height where the runner reaches the soil without stretching taut.
Rest the base of the pup on the soil without burying its leaves.
Bend a paper clip into a U-shape and push it into the soil over the runner right behind the pup to keep the base in firm contact with the soil.
Water the small pot whenever the soil surface feels dry to the touch, keeping it moist but never soggy. Keep the pots in bright, indirect light without direct sun hitting the leaves.
Once a week, give the pup a gentle tug. If it resists, the roots have taken hold. If it lifts easily, leave it in place and check again the following week.
Cut the runner flush against the plantlet using clean shears. The new plant stays in its small pot.
This method places no strain on the mother plant. It loses neither leaves nor roots, and the pup receives water and nutrients through the runner while roots develop. If the pup fails to take root, you lose nothing: it remains dangling just as it was.
You can root multiple pups at once, each in its own small pot. You can also rest two or three pups in the same container so the new plant grows in bushier from the start.
When a Spider Plant Pup Is Ready to Cut
The pup is ready to cut when it has its own roots. Size alone tells you nothing. The RHS (the Royal Horticultural Society in the United Kingdom) and Clemson use the same criterion: separate the pup only after roots have formed.
On the pup still dangling, look at the base. Short white roots emerging there show that it has already begun rooting. The New York Botanical Garden (NYBG) gives a benchmark for a cut pup: six or more leaves, a few inches long, with small roots showing at the base.
For a pup resting on soil, the test is a gentle tug. NYBG estimates about 2 months for roots to establish and advises cutting once the plantlet resists a pull. None of the consulted sources specify a precise length in inches for readiness, so rely on the tug test rather than the calendar.
Did you snip a pup with zero roots? It can still succeed. NYBG recommends dipping the base in rooting hormone sold at garden centers. Then, keep the base tucked into moist potting soil until roots develop.
Spider plant propagation in water or in soil
Both work, and no source has compared the two in spider plants. The RHS accepts both approaches: pinning the pup to the soil or placing it in a glass of water and planting it once roots grow. SDSU Extension also mentions water for a few weeks to encourage roots before planting.
This guide recommends soil, with the pup remaining attached to the mother plant. Wisconsin, Clemson, and NYBG describe this as the primary method. The advantage is practical: the plantlet starts growing right where it will live, skipping a second adjustment period from water to soil.
If you prefer water, follow these steps:
Cut the pup and remove any lower leaves that would sit submerged.
Place the pup in a glass of water, only deep enough to cover the base. Keep the leaves out of the water.
Change the water whenever it becomes cloudy.
Transplant into soil once roots reach 1 inch (2.5 cm) or longer, per NYBG guidance.
How to Divide a Spider Plant Clump During Repotting
Division works best for mature, root-bound plants filling their containers. It is also the ideal solution for spider plant varieties that rarely produce runners. Clemson notes that repotting can take place at any time of year.
The right time arrives when roots push soil out of the container or deform the pot walls. Clemson recommends dividing and repotting before expanding roots crack the container.
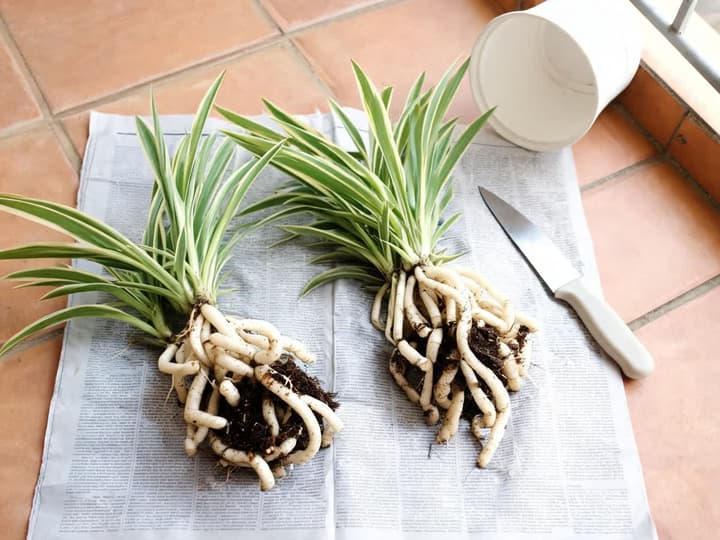
Remove the plant from its pot and work the soil away from the roots using your fingers.
Separate the clump by hand into two or three sections. Spider plant roots are thick and fleshy: if they will not pull apart, slice through them with a clean knife, as recommended by the RHS.
Ensure each divided section contains both leaves and an active crown, the central point where the foliage emerges.
Pot each section into fresh potting mix in a container just slightly larger than its root mass.
Water thoroughly until moisture drains freely from the bottom hole.
Avoid oversized containers. Wisconsin notes that spider plants grow and produce pups best when slightly root-bound. An overly large pot leaves empty soil that stays wet too long.
Spider Plant Propagation Care in the First Weeks
New cuttings need bright indirect light, evenly moist soil without standing water, and zero fertilizer at first.
Light: bright indirect light, with no direct sun on the leaves. The NC State Extension describes the spider plant as a medium-light plant that does not tolerate direct sun.
Watering: water when the soil surface feels dry to the touch, adding water until it runs out of the drainage hole. Empty the saucer beneath it promptly.
Fertilizer: none for the first 4 to 6 months after potting, following Clemson recommendations for newly potted plants.
Pot: must include a bottom drainage hole. Pots without drainage let water pool at the base, rotting tender young roots.
Waterlogged soil rots cutting roots, and Wisconsin points to overwatering as the primary cause of root rot. Spider plant roots store water, so young plants handle a few days of dry soil far better than weeks of boggy soil.
Why Your Spider Plant Is Not Producing Pups
A spider plant without plantlets usually stems from one of four causes. These are detailed by the RHS and Wisconsin, and nearly all are easy to fix.
The plant is too young. The RHS notes that most spider plants only flower and produce pups once they reach at least 1 year of age.
The pot is too large. The RHS, Wisconsin, and NYBG agree: root-bound plants produce more pups. Following repotting, plantlet production slows down for a period.
Excess fertilizer. Wisconsin and NC State report that over-fertilized plants produce fewer offsets.
Low daytime light or cold temperatures. The RHS cites both as conditions that discourage flowering. Without flowers, runners do not develop pups.
Cultivar characteristics also play a role. Wisconsin notes that the 'Variegatum' variety, featuring green leaves with white margins, produces fewer pups than other types. For this variety, clump division is the best route.
The time of year also matters, but is not the only factor. Clemson notes that most pups appear when days shorten in autumn, which in Brazil runs from March to June. NC State mentions less than 12 hours of light per day for at least 3 weeks. In Brazil, the day has less than 12 hours of light between the end of March and the end of September.
A published experiment shows that short days are not mandatory. Researchers at the University of Minnesota tested various light schedules on solid-green spider plants (Heins and Wilkins, 1978). All plants produced runners and flowered, and turning on a light in the middle of the night increased the number of runners. The NYBG lists night light as a cause of fewer pups, but a measured experiment carries more weight than an observation. Therefore, before changing your lighting, check the four causes above.
Growing Spider Plants from Seed
You can grow spider plants from seed, but home growers rarely need to. Seeds only form when flowers are pollinated, developing small capsules containing flat black seeds. Wisconsin cautions that seedlings may lack the white stripes of the parent plant. With pups and division readily available, seed propagation is best left as a novelty project.
Confirming Your Plant Is a Spider Plant
Spider plants do not have branches or woody stems. Their long, strap-like leaves emerge entirely from a central crown at the soil line. The slender cascading stems hanging from the plant are runners, and pups develop at their tips.
A plant featuring woody stems, nodes, and leaves along a vine belongs to a different species. Propagating those requires stem cuttings. One common example is pothos, which also features variegated green-and-white foliage and trailing stems. For that species, follow our guide on how to propagate pothos from stem nodes.
When unsure, Bloom (available for iOS) identifies species from a quick leaf photo. Knowing the exact plant prevents applying the wrong propagation technique.
Frequently Asked Questions
Can I leave pups hanging on my spider plant?
Yes. Clemson notes that plantlets can remain on the mother plant to create a lush, full hanging basket. NYBG states they can survive hanging for many years. Removing them is entirely optional. The RHS suggests trimming them back when they become heavy with tangled aerial roots, assuming you do not intend to pot them.
How many spider plant pups can I plant together?
Placing two or three pups in a single small pot produces a bushier plant much faster than rooting a single pup. Space them a couple of inches apart so their roots have room to grow. Use a pot with bottom drainage and well-draining soil: adding more pups to a container does not protect against waterlogging.
Do spider plants prefer sun or shade?
Neither harsh direct sun nor heavy shade. NC State notes that spider plants prefer medium indirect light, tolerate partial shade, and cannot handle direct sunlight. The RHS adds that low light slows growth and can fade variegation. The ideal spot is near a bright window out of direct rays.
Can a spider plant pup without roots grow?
It can root, though the failure rate is higher. The safest approach is resting the attached pup on soil until roots form. If it was already snipped, NYBG advises dipping the base in rooting hormone and keeping it planted in moist potting soil until roots appear.
Where to Start Today
Choose the healthiest, firmest pup on the plant, fill a small container with moist potting soil, and pin the pup to the surface with a paper clip while keeping it attached to the mother. Test it once a week with a gentle tug. Once it anchors firmly, snip the runner, and your new plant is set.
Related articles
How to Care for a Maidenhair Fern: Light, Water, and Revival Tips
Learn how to care for a maidenhair fern indoors: bright indirect light, consistently moist soil, high humidity, and how to revive it if it dries out completely.
Banana plant fertilizer: fertilizing potted and backyard plants
Banana plant fertilizer needs more potassium than nitrogen, in a 3-1-6 ratio. For a potted plant on a balcony, use the label dose in spring and summer. In the backyard, fertilize every 2 months, adjusting the amount by mat age. Learn the formula, timing in Brazil, and signs of deficiency or excess.
Does lucky bamboo like sun? Ideal light and where to place it
Lucky bamboo does not like direct sun: it burns the leaves. But a dark corner also weakens the plant. Learn how much light it needs, where to place the pot in a home in Brazil, and how to read signs of too much or too little light.