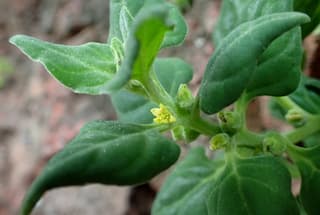
New Zealand Spinach with Slugs and Snails? Rare but Treatable
Tetragonia tetragonoides
Slugs and Snails on New Zealand Spinach: What to Know?
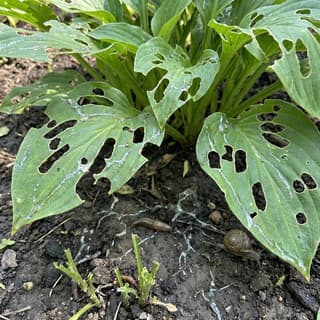
Slugs and Snails on New Zealand Spinach (Tetragonia tetragonoides) is a pest condition with moderate severity. New Zealand Spinach has low susceptibility to this disease. Slugs and snails are mollusks that feed on plant tissue, causing irregular holes in leaves and damage to young seedlings. They are most active at night and in moist conditions, leaving characteristic...
New Zealand Spinach is a easy-care plant. Recovery from Slugs and Snails takes approximately 14 days with proper treatment.
Unlike most plants, New Zealand Spinach has natural resistance to Slugs and Snails. Best treated with preventive measures rather than reactive treatment. Unlike fungal diseases, Slugs and Snails on New Zealand Spinach responds quickly to integrated pest management.
🔍 What Does Slugs and Snails Look Like on New Zealand Spinach?
- • Irregular holes in leaves with smooth edges
- • Silvery, shiny slime trails on leaves and soil
- • Missing or completely eaten seedlings
- • Ragged leaf edges and damaged tender shoots
- • Damage concentrated at ground level
- • Visible slugs or snails on plants during evening/night
❓ What Causes Slugs and Snails on New Zealand Spinach?
- → High moisture and humidity levels
- → Dense plant growth providing hiding spots
- → Mulch, leaf litter, and debris near plants
- → Overwatering and poor drainage
- → Cool, damp weather conditions
- → Presence of host plants with tender foliage
💊 How to Treat Slugs and Snails on New Zealand Spinach?
TLDR: Treat Slugs and Snails on New Zealand Spinach with quick treatment (~7 days) or organic (~14 days). New Zealand Spinach has low susceptibility to this disease.
Quick Fixes
Step 1
Apply iron phosphate baits (Sluggo) around affected plants following package directions
Step 2
Scatter pellets in evening when slugs are active, using 1 teaspoon per square yard
Step 3
Focus application near hiding spots and damaged plants
Step 4
Handpick any visible slugs during evening inspection
Step 5
Reapply bait every 7-10 days or after heavy rain
Step 6
Monitor for reduced damage after 3-5 days
Step 7
Continue treatment for 2 weeks minimum
Organic Treatment
Step 1
Handpick slugs and snails during evening hours when they are most active
Step 2
Set beer traps by burying shallow containers filled halfway with beer near affected plants
Step 3
Sprinkle diatomaceous earth in a 2-inch wide barrier around plant base
Step 4
Wrap copper tape around pots or create copper barriers around beds
Step 5
Remove hiding spots like boards, rocks, and dense mulch
Step 6
Water plants in the morning only to reduce nighttime moisture
Step 7
Check traps daily and refresh beer every 2-3 days
Step 8
Reapply diatomaceous earth after rain or watering
🛡️ How to Prevent Slugs and Snails on New Zealand Spinach?
TLDR: Prevent Slugs and Snails on New Zealand Spinach with 6 essential preventive care practices.
- ✓ Remove hiding spots like boards, pots, and dense mulch
- ✓ Water plants in the morning to reduce nighttime moisture
- ✓ Create barriers using copper tape or diatomaceous earth
- ✓ Reduce dense plant growth to improve air circulation
- ✓ Keep garden clean by removing plant debris regularly
- ✓ Use drip irrigation instead of overhead watering
🌱 How to Care for New Zealand Spinach to Prevent Slugs and Snails?
💧 How to Water
Water every 4-6 days during active growth. Once established, reduce watering as the plant is drought-tolerant. Avoid waterlogging — this plant prefers slightly dry conditions over soggy soil.
☀️ Lighting
Requires full sun (at least 6-8 hours per day). Does not tolerate shade — insufficient light leads to leggy growth and reduced leaf production.
🪴 Ideal Soil
Prefers well-draining, moderately fertile soil. Thrives in sandy or loamy soil with a pH of 6.0–7.5. Enriching with organic compost before planting improves leaf quality.