Root-Bound: Environmental Stress | How to Fix
Root-bound, also called pot-bound, is a common environmental condition that occurs when a plant's roots have outgrown their container. The roots become so densely packed that they circle around the root ball and cannot expand properly. This restricts the plant's ability to absorb water and nutrients, leading to stunted growth and declining health. Unlike diseases, being root-bound is not contagious and is entirely preventable through proper container management and regular repotting.
Slow
14 days
What is Root-Bound?
Root-Bound is a environmental condition with moderate severity that affects plants. Root-bound, also called pot-bound, is a common environmental condition that occurs when a plant's roots have outgrown their container. The roots become so densely packed that they circle around the root ball and cannot expand properly. This restricts the plant's ability to absorb water and nutrients...
Root-Bound is a environmental disease with moderate severity that spreads at a slow rate. Recovery typically takes approximately 14 days with proper treatment. It affects 10 plant species in our database.
Unlike infectious diseases, Root-Bound is caused by environmental conditions. Without correcting the environment, symptoms return even after treatment. Unlike many common diseases, Root-Bound is not contagious between plants.
🔍 What Are the Symptoms of Root-Bound?
TLDR: Root-Bound presents 10 main symptoms. Early identification is crucial for effective treatment.
Main Symptoms
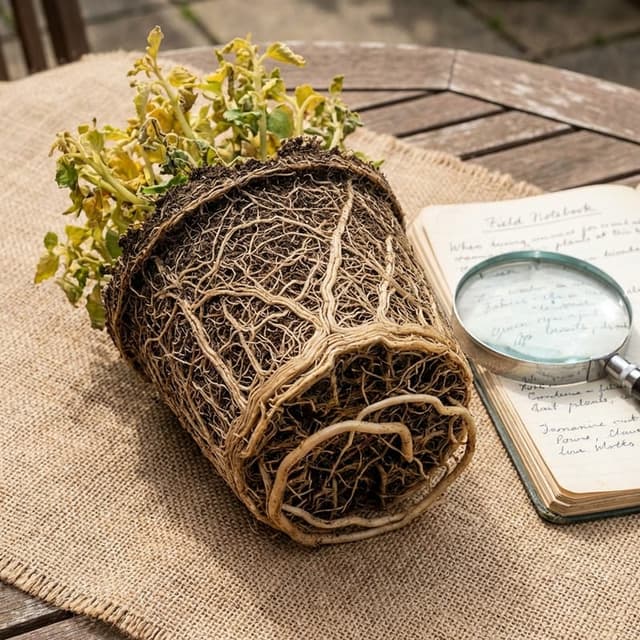
- ! Roots visibly growing out of drainage holes
- ! Dense circular root mass around pot edges
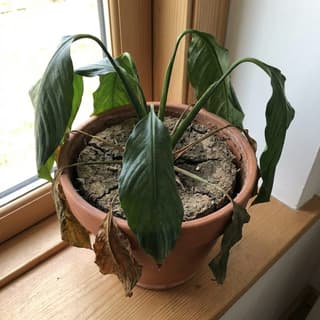
- ! Soil dries out extremely quickly after watering
- ! Water runs straight through without being absorbed
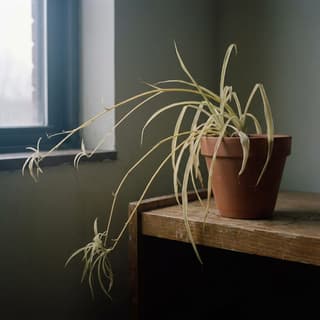
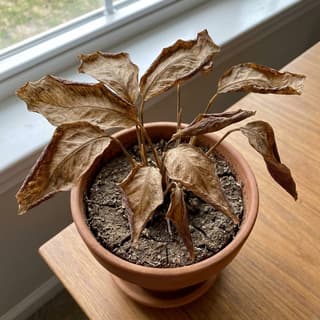
- ! Stunted or significantly slowed growth
- ! Yellowing or dropping of lower leaves
- ! Frequent wilting despite regular watering
- ! Reduced flowering or no new blooms
- ! Pot becoming distorted or cracked from root pressure
- ! Thick roots visible on soil surface
Visual Signs
❓ What Causes Root-Bound in Plants?
- → Container too small for plant size
- → Plant not repotted for extended period (2+ years)
- → Fast-growing species in restricted space
- → Inadequate pot size at initial planting
- → Neglecting regular root maintenance
- → Using non-expanding containers without upgrades
💊 How to Treat Root-Bound?
TLDR: Treat Root-Bound with 7 days of quick treatment or 14 days of organic treatment. Full recovery takes approximately 14 days.
Quick Fixes
~7 days
Quick assessment
Remove plant from pot. If roots are extremely tight and circling, proceed immediately with aggressive treatment.
Fast soak
Submerge root ball in water for 30-60 minutes only. This loosens soil just enough for quick work.
Aggressive root pruning
Using sharp shears, cut away outer 2 inches of root mass all around. Make 4-6 deep vertical cuts (½ inch) into root ball. Speed is key - work quickly but carefully.
Score root ball
Make X-shaped cuts across the bottom of root ball (½ inch deep). This forces rapid new root growth in all directions.
Immediate repotting
Place in new pot 2-4 inches larger with fast-draining potting mix. Fill quickly, ensuring good soil contact with roots.
Transplant solution application
Water immediately with diluted transplant shock solution (vitamin B1-based). This accelerates root establishment.
Stress reduction
Move to bright indirect light immediately. Maintain consistent moisture for first week - check daily and water when top inch is dry.
Early fertilization
After 7 days, apply half-strength liquid fertilizer to boost recovery. Resume full strength after 3 weeks.
Materials needed:
Organic Treatment
~14 days
Prepare workspace
Gather materials: new pot (1-2" larger), fresh organic potting mix, pruning shears, water bucket, and newspaper or tarp to protect work area.
Remove plant gently
Turn pot sideways and gently slide plant out while supporting the base. If stuck, run a knife around the edge or gently squeeze flexible pots.
Overnight root soak
Submerge entire root ball in room temperature water overnight (8-12 hours). This naturally loosens compacted roots without chemicals.
Gently tease roots
Using fingers, carefully separate and untangle circling roots. Work from outside toward center. Be patient - this may take 15-20 minutes for severely bound plants.
Natural root pruning
Trim outer 1 inch of circling roots with clean shears. Make 3-4 shallow vertical cuts (¼ inch deep) along the root ball sides to stimulate outward growth.
Prepare new container
Add 2 inches of fresh organic potting mix to bottom of new pot. Ensure pot has adequate drainage holes.
Replant carefully
Center plant in new pot at same depth as before. Fill around sides with fresh mix, gently pressing to eliminate air pockets but avoid compacting.
Initial watering
Water thoroughly with room temperature water until it drains freely. This settles soil around roots without using chemicals.
Recovery period
Place in bright indirect light for 7-10 days. Avoid direct sun and fertilizers. Keep soil lightly moist but not waterlogged.
Gradual acclimation
After 2 weeks, gradually return to normal light conditions. Resume regular watering schedule. Wait 4-6 weeks before fertilizing.
Materials needed:
Expert Treatment
~21 days
Complete root assessment
Document current root condition with photos. Measure root ball diameter and density. Calculate root-to-shoot ratio to determine optimal new pot size.
Controlled hydration
Soak root ball for 2-4 hours in water with added mycorrhizal inoculant. This prepares roots for beneficial fungal colonization.
Systematic root liberation
Working in sections, carefully untangle circling roots. Use root rake or chopstick to gently separate without tearing. Document any damaged areas.
Precision pruning protocol
Remove only dead, damaged, or excessively circling roots. Make clean cuts at 45-degree angles. Prune no more than 25-30% of total root mass. Apply rooting hormone powder to cut surfaces.
Strategic scoring
Make 4-6 vertical scores (¼-½ inch deep) evenly spaced around root ball. Score bottom in cross pattern. This directs new growth outward.
Optimized soil preparation
Create custom blend: 60% quality potting mix, 25% perlite, 10% worm castings, 5% coconut coir. Add controlled-release fertilizer and beneficial microbes.
Professional repotting technique
Choose pot 1.5-2x current root ball diameter. Layer bottom with drainage material. Position plant at precise original depth. Fill methodically, eliminating air pockets.
Root establishment watering
Water with kelp-based root stimulator solution. Water deeply until 20% runoff achieved. This ensures complete soil hydration.
Environmental optimization
Maintain 65-75°F temperature, 50-60% humidity, bright indirect light for 2 weeks. Use humidity dome if available for first 3-5 days.
Monitored recovery protocol
Check soil moisture with meter daily. Foliar feed with dilute seaweed solution weekly. Document new growth emergence. After 4 weeks, perform gentle tug test to verify root establishment.
Long-term root management
Establish repotting schedule based on species growth rate. Monitor root health every 6 months. Implement root pruning maintenance annually for established plants.
Step by Step
- 1
Inspect plant by gently removing from pot
- 2
Assess extent of root binding
- 3
Soak root ball in water for 30-60 minutes to loosen
- 4
Gently tease apart circling roots with fingers or tool
- 5
Prune outer 1-2 inches of root mass with clean shears
- 6
Make vertical slits on sides of root ball
- 7
Select new pot 1-2 inches larger in diameter
- 8
Fill bottom with fresh, well-draining potting mix
- 9
Place plant at same depth as before
- 10
Fill sides with soil, gently firming as you go
- 11
Water thoroughly until draining from bottom
- 12
Place in bright indirect light for 1-2 weeks
- 13
Resume normal watering schedule after 2 weeks
🧪 Natural vs Chemical: Which Treatment Works for Root-Bound?
🌱 Natural Solutions
- ✓ Carefully remove plant from current container
- ✓ Gently tease apart circling roots with fingers
- ✓ Soak root ball overnight to loosen compacted roots
- ✓ Trim outer circling roots by 1-2 inches using clean shears
- ✓ Make 3-4 vertical cuts along root ball sides to encourage outward growth
- ✓ Repot in container 1-2 inches larger with fresh potting mix
- ✓ Water thoroughly after repotting to settle soil
- ✓ Keep in shade for 1 week to reduce transplant shock
💉 Chemical Solutions
- ✓ Use root pruning shears for severely bound roots
- ✓ Apply root growth hormone to cut surfaces
- ✓ Use anti-stress transplant solutions
- ✓ Apply systemic fertilizer after 2 weeks to support recovery
Treatment Comparison
| Type | Estimated time | Steps | Difficulty | Best For |
|---|---|---|---|---|
| ⚡Quick | ~7 days | 8 | Advanced | Urgent cases |
| 🌿Organic | ~14 days | 10 | Advanced | Indoor plants |
| 🔬Expert | ~21 days | 11 | Advanced | Severe infections |
🛡️ How to Prevent Root-Bound?
TLDR: Prevent Root-Bound with 8 essential care practices. Regular monitoring is key for early detection.
- ✓ Repot fast-growing plants every 1-2 years
- ✓ Repot slow-growing plants every 2-3 years
- ✓ Choose pots 1-2 inches larger in diameter when repotting
- ✓ Use well-draining potting mix to encourage healthy root growth
- ✓ Monitor drainage holes regularly for emerging roots
- ✓ Check root health annually by gently removing plant from pot
- ✓ Select appropriate pot size based on plant growth rate
- ✓ Avoid keeping plants in same container for too long
🔗Related Diseases
Low Light Stress
MediumLow light stress, also known as etiolation, occurs when plants do not receive adequate light for proper growth and development. This leads to abnormal growth patterns characterized by elongated stems, pale leaves, and weakened overall structure as the plant attempts to reach toward available light sources.
Underwatering
HighUnderwatering or drought stress is a physiological disorder that occurs when the amount of water a plant loses through transpiration exceeds the amount its roots can absorb from the soil. This leads to cellular dehydration and various visible symptoms that can compromise plant health and productivity.
Low Humidity Stress
MediumLow humidity stress occurs when indoor air becomes too dry, causing plants to lose moisture faster than they can absorb it through their roots. This is especially common during winter heating periods, near radiators and heating vents, or in air-conditioned spaces. Tropical plants are particularly susceptible to low humidity damage.
Edema
LowEdema (also spelled oedema) is a non-infectious physiological disorder caused by an imbalance between water uptake and transpiration. When roots absorb water faster than leaves can release it through transpiration, cells in the leaf tissue swell and burst, forming characteristic wart-like blisters. This is purely a cosmetic issue and does not threaten plant health.
🌿 Which Plants Are Most Affected by Root-Bound?


Sources & References
- Root-Bound Plant Guide: How to Fix a Root-Bound Plant - MasterClass
- Root Bound Symptoms - Help For Root Bound Plants | Gardening Know How
- Root Bound Plant Symptoms and Repotting Tips - Wild Interiors
- Root Bound: Prevention, Symptoms, Treatment | Hydrobuilder.com
- How to Repot a Root Bound Plant - The Green Mad House